Hole By Hole

Course Overview

The course was designed by Francisco Moreno and opened in 1981. Situated 100 kilometres from Alicante on the way to Valencia, and sheltered from the wind by Cape San Antonio, the course has a perfect microclimate all the year round, and is located in a wonderful natural setting, surrounded by pinewoods.

The course is a gently sloping 9-hole course with well-maintained greens and fairways flanked by palm trees, pine trees and orange trees. Although it has only 9 holes, on the second time around or the back nine, many of the holes are played from different tees making it virtually an 18-hole course. Also the 3rd/12th and 4th/13th greens are large enough to accommodate two separate pin positions for each hole.

The 6th hole presents difficulties, a par 4 with splendid views from a plateaud green requiring a safe and precise drive to the dogleg. The 120 meter 16th is the shortest hole and the 475 meter 5th is the longest.

Although it is not a long course, it is certainly challenging as it is plagued by bunkers nearly all the way round – 27 in total over the nine holes, and all of the greens have subtle runs, many of which are difficult to read.

Javea Golf Club Hole by Hole

Holes 1 and 10

1st Hole : The opening hole is a par 3. The green is guarded by two large bunkers on either side and selecting the correct club for the distance is essential. The approach to the green is slightly raised and often prevents the short ball from rolling onto the green.

10th Hole : This hole is a long Par 3 played from the back tee down to a green guarded by bunkers to the left and right. Shorter hitters may need a driver, especially into the wind.

Hole 1

  • Par: 3
  • White: 158
  • Yellow: 149
  • Red: 132
  • Handicap: 15

Hole 10

  • Par: 3
  • White: 184
  • Yellow: 172
  • Red: 152
  • Handicap: 10

Holes 2 and 11

2nd Hole : The 2nd hole is a short par 4. There is a bunker on the right of the fairway to catch the drive. The fairway rises to the green where is not possible to see the base of the flag. When playing your approach shot to the green you need to have enough club to account for the gradient. There is also a bunker to the front of the green left and another greenside bunker to the right.
11th Hole : Although sharing the same green as the 2nd hole, the 11th tee is elevated and some 10 meters further back than the 2nd. The palm trees make the drive look tighter than it is. There is a bunker on the right to catch the drive and a small olive tree on the left hand side of the fairway which often seems to be strategically placed, there are more trees further left that can come into play.

Hole 2

  • Par: 4
  • White: 322
  • Yellow: 308
  • Red: 268
  • Handicap: 9

Hole 11

  • Par: 4
  • White: 343
  • Yellow: 319
  • Red: 285
  • Handicap: 8

Holes 3 and 12

3rd Hole : The 3rd hole, a par 5, requires three good shots especially if the prevailing wind is against, into a green guarded in the front by a bunker. Short puts can never be guaranteed as the green slopes from back to front and from right to left.
12th Hole : The 12th hole fully justifies its rating as stroke index 2 especially into the wind. The fairway doglegs to the left and big hitters will have to drive over the trees on the left or face running out of fairway behind the numerous trees to the right. There is also a palm tree strategically placed in the middle of the fairway some 70 meters from the green which has a narrow entrance with bunkers on either side.

Hole 3

  • Par: 5
  • White: 465
  • Yellow: 432
  • Red: 410
  • Handicap: 7

Hole 12

  • Par: 4
  • White: 379
  • Yellow: 373
  • Red: 302
  • Handicap: 2

Holes 4 and 13

4th Hole : The fairway rises gently to this stroke index 1 hole. The major difficulty is in its length especially into a prevailing wind. There are also two strategically placed bunkers to the left of the fairway which can often come into play. A sharp rise onto the green itself will quickly halt a short ball. There is also a greenside bunker to the left. For ladies the hole is much shorter justifying a stroke index of 11.

13th Hole : The 4th and the 13th holes share a huge green. The farthest flag is hole 13. Center or left on the fairway is the best approach to the flag as there is a large tree beside the green which will mask the flag for those on the right or just off the fairway on the right. There is also a hidden bunker on the left of the green when playing this hole.

Hole 4

  • Par: 4
  • White: 390
  • Yellow: 372
  • Red: 282
  • Handicap: 1

Hole 13

  • Par: 5
  • White: 432
  • Yellow: 421
  • Red: 384
  • Handicap: 16

Holes 5 and 14

5th Hole : On this second Par 5 which has magnificent views of the Montgo, the fairway drops down to a green guarded across the front by two bunkers either side of a narrow entrance. It is essential to keep your second shot in the center or left of the fairway so as to avoid the bunker and trees on the right as the fairway doglegs slightly from left to the right from a 100 meters out.

14th Hole : As with Hole 5 there are also two bunkers on the right of the fairway to catch the drive, and a line of trees down the left. The angle of the tee makes the drive far from straight forward.

Hole 5

  • Par: 5
  • White: 469
  • Yellow: 455
  • Red: 412
  • Handicap: 13

Hole 14

  • Par: 5
  • White: 450
  • Yellow: 438
  • Red: 369
  • Handicap: 14

Holes 6 and 15

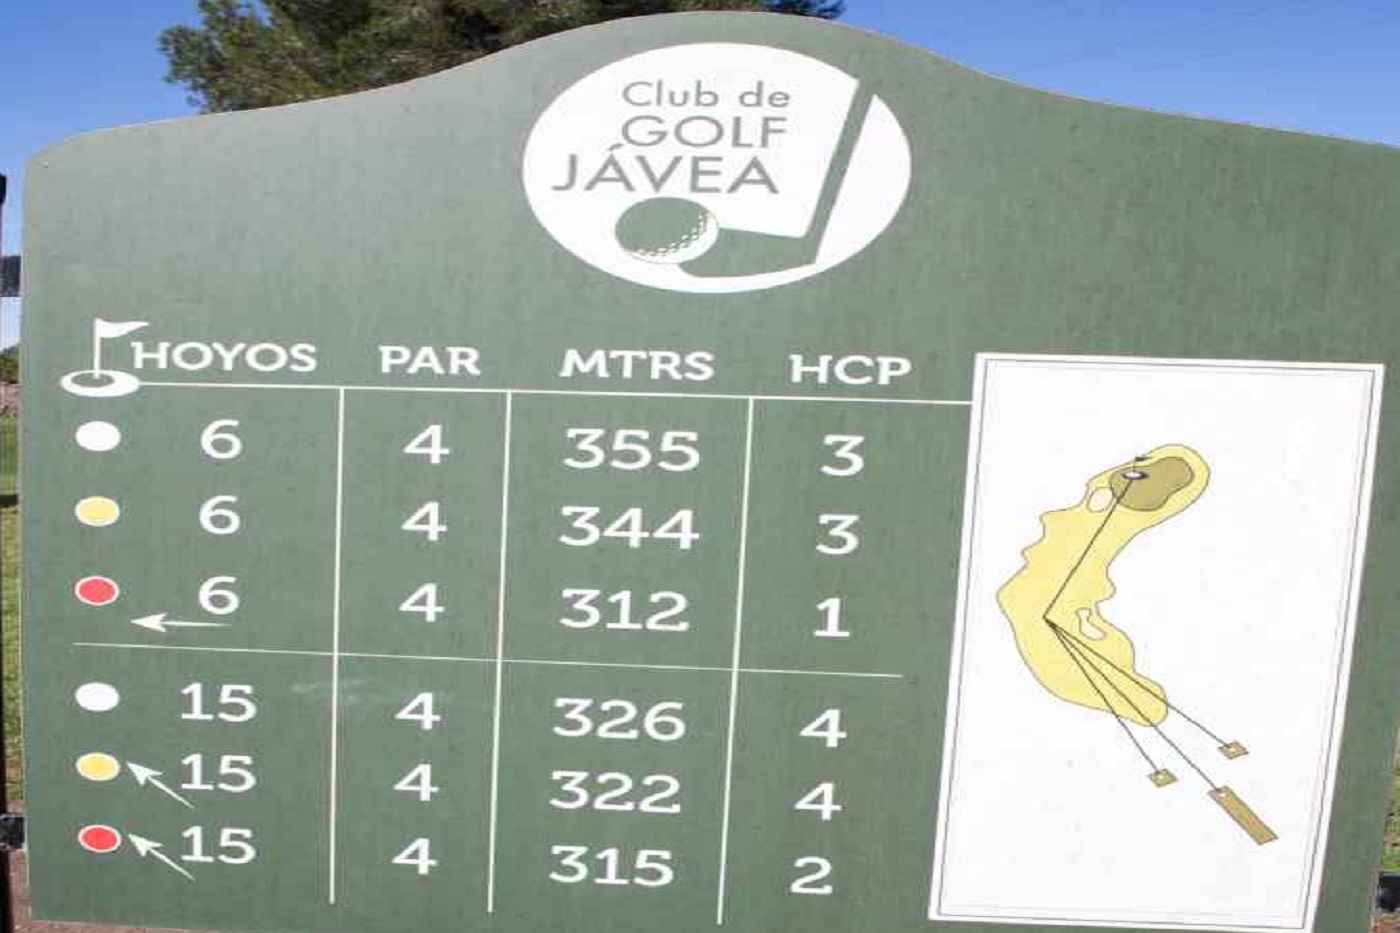
6th Hole : The hole doglegs sharply to the right and demands a long accurate tee shot to reach the corner of the fairway which has a bunker on the right. Big hitters may try to carry the out of bounds and trees on the right to leave a short wedge to the green. The approach to the two tier green is steep and, depending upon the pin placement, no putt can be guaranteed.
15th Hole : Again, this is a very difficult hole for driving, approaching the green and putting. Although the 15thtee is some 30 meters shorter than the 6th, it is aligned with the out of bounds fence to the right. Not a drive for the faint-hearted and, even if on the fairway, a second shot to the green over the out of bounds and trees is not unusual.

Hole 6

  • Par: 4
  • White: 355
  • Yellow: 344
  • Red: 312
  • Handicap: 3

Hole 15

  • Par: 4
  • White: 326
  • Yellow: 322
  • Red: 315
  • Handicap: 4

Holes 7 and 16

7th Hole :The 7th is a short Par 3. The green is guarded by bunkers either side. The green is deceptively difficult to read as it slopes not only from back to front but also from right to left. Leaving your ball above the hole is not advisable.
16th Hole : Although 20 meters shorter than the 7th, the tee is situated much further to the right, bringing olive trees and a green side bunker into play. Again, it is better to leave your putt short of the hole rather than above on this tricky green. There is also an out of bounds fence to the right.

Hole 7

  • Par: 3
  • White: 130
  • Yellow: 119
  • Red: 107
  • Handicap: 17

Hole 16

  • Par: 3
  • White: 111
  • Yellow: 104
  • Red: 97
  • Handicap: 18

Holes 8 and 17

8th Hole : Trees line the fairway on both sides and there is a bunker on the right to catch the drive. The tee deceptively points slightly to the right towards the cypress trees lining the course and out of bounds making correct alignment essential. The fairway rises gently to a two tier green guarded by bunkers to the front left and the right

17th Hole : This hole shares the same green and tee as the 8th. A good drive will set up an opportunity to reach the elevated two tier green, but take an extra club to account for the gradient.

Hole 8

  • Par: 4
  • White: 312
  • Yellow: 302
  • Red: 268
  • Handicap: 11

Hole 17

  • Par: 4
  • White: 312
  • Yellow: 302
  • Red: 268
  • Handicap: 12

Holes 9 and 18

9th Hole : This long par 4 is set against the magnificent backdrop of the Montgo and is made exceptionally difficult when the prevailing wind is against. Care must be taken with the tee shot to avoid out of bounds on the right.
18th Hole : This can be a formidable hole especially against the wind, so a long and accurate drive is required if you want to reach the green in regulation. There are trees on both left and right of the fairway. The green rises gently from the front to the back which may require at least one extra club depending on the pin position. There is also a greenside bunker to the right.

Hole 9

  • Par: 4
  • White: 383
  • Yellow: 371
  • Red: 360
  • Handicap: 5

Hole 18

  • Par: 4
  • White: 383
  • Yellow: 371
  • Red: 360
  • Handicap: 6